In this post I will show you how you can easily switch Episerver to use OpenID Connect for authentication and authorization. I’ll use the Episerver MVC Alloy with Find search service and cover the common issues you might face when implementing this.
I know I’m not the first one to blog about this and I myself have learned from the previous posts and believe I will add more knowledge to those posts. If OpenID Connect (OIDC) is something new to you I suggest that you first have a look at the OpenID Connect site.
To be able to use OpenID Connect you first need a service that you can use as the Identity Provider (IdP). In this sample I will be using IdentityServer4 and I have created a .NET Core sample solution derived from IdentityServer4.Quickstart.UI. You can get my solution from my GitHub repository.
If for some odd reason you don’t know Episerver Alloy MVC sample site then it is time to download and install the Episerver CMS Visual Studio extension and play around with Alloy.
Rest of the post assumes you are using my InMemory IdentityServer cofiguration.
For the sample implementation I’m using Visual Studio 15.8.4, .NET Framework 4.7.2 and Episerver CMS Visual Studio Extension version 11.4.0.370.
If you are creating a new Episerver project and want to use OIDC then you would just skip the MVC Alloy creation steps and use the parts where the needed NuGet packages are added + web.config changes. So skip to the ‘Add OIDC implementation needed NuGet packages‘ title (Editorial note: isn’t it nice when you can’t create links to the same page).
Create Episerver MVC Alloy site
First step is to create the Episerver MVC Alloy site which we’ll be switching to use OIDC. So, start Visual Studio and create a new site using the ‘Episerver Web Site’ template.
- .NET Framework 4.7.2
- Select the Alloy (MVC) template
- Ensure ‘Configure Search’ is checked
- and ‘Episerver Find’ is selected
- In real projects, the next step would be to configure Episerver UI and Util paths to something else than the defaults!
- Update all Episerver NuGet packages
- currently update 232
- make sure you have Episerver Find 13.0.3 or greater
- we later add a package that requires Newtonsoft.Json 11+
- For now leave the nuget.org feed NuGet packages alone
Remove ASP.NET Identity from Alloy solution
Alloy uses ASP.NET Identity but we want to replace that with OpenID Connect so the next step is to remove that implementation. For demo purposes you could just leave those hanging there but for this posting to apply as guide for fresh customer projects I will first remove the ASP.NET Identity.
Some of the configurations we need with OIDC are the sames that Alloy has already added to web.config and also has added the Startup.cs file which contains the OWIN configuration. We will re-use those in the OIDC implementation.
- Open Startup.cs
- Delete all code inside the Configuration method
- Comment out everything in the file
- Delete the file: Business\AdministratorRegistrationPage.cs
- Delete the file: Controllers\RegisterController.cs
Next step is to remove some NuGet packages added by the Alloy template. Some of the NuGet packages we will be adding back in the coming steps – this is done just that this sample is usefull when creating a new customer project so you know which NuGet packages are actually needed.
- Remove the following NuGet packages (in the order they are in the listing)
- EPiServer.Cms.UI.AspNetIdentity
- Microsoft.AspNet.Identity.EntityFramework
- Microsoft.AspNet.Identity.Owin
- Microsoft.AspNet.Identity.Core
- Microsoft.Owin.Security.OAuth
- Microsoft.Owin.Security.Cookies
- Microsoft.Owin.Security
- Microsoft.Owin.Host.SystemWeb
- Microsoft.Owin
- Owin
Add OIDC implementation needed NuGet packages
Add the following NuGet packages as we will need these in the OIDC implementation. These packages will also install all required dependencies naturally.
- Microsoft.Owin.Host.SystemWeb, current latest version 4.0.0
- if you don’t add this, your OWIN startup assembly Configuration method will never be called
- Microsoft.Owin.Security.OpenIdConnect, current latest version 4.0.0
- Microsoft.Owin.Security.Cookies, current latest version 4.0.0
- Update this package, Microsoft.IdentityModel.Protocols.OpenIdConnect, current latest version 5.2.4
- IdentityModel, current latest version 3.9.0
- has dependecy to Newtonsoft.Json >= 11.0.1 so that’s why we had to install the prerelease of Episerver Find
- the 3.2.0 version is what you can install if you have to use Newtonsoft.Json 10.x but this will cause you some problems with dependant packages, pulling .Net standard packages which you don’t actually need but I’ll add a comment about this at the end
Now you can optionally update all the remaining nuget.org feed packages.
Prerequisites configuration to implement OpenID Connect in Alloy
Next step is to make some changes to Startup.cs and web.config to preparae the solution to usee OIDC in Alloy site.
- uncomment the previously commented out code in Startup.cs
- if this was a new Episerver project then here you would add the Startup.cs file to your solution, see Microsoft documentation about it
- assuming you have deleted all code inside the Configuration method
- remove the broken using clauses (leftovers from ASP.NET Identity)
- Microsoft.AspNet.Identity
- Microsoft.AspNet.Identity.Owin
- EPiServer.Cms.UI.AspNetIdentity
- add EPiServer logging abstraction
- add: using EPiServer.Logging;
- add: private static readonly ILogger Logger = LogManager.GetLogger(typeof(Startup));
- edit web.config
- add attribute enabled=”false” to roleManager node
- NOTE! The correct authentication, membership and rolemanager web.config configuration is documented here by Episerver (see the title: Prerequisites)
- this page also documents the needed configuration for ‘SynchronizingRolesSecurityEntityProvider‘
Implementing the OWIN configuration
The implementation uses OWIN and OWIN middlewares to configure the application.
- Middlewares used
- Cookie based authentication
- OpenID Connect authentication
As much as I would like to copy paste the whole code here it really isn’t an option with my current blogging engine – the page blows up 😀 So all code is in my public GitHub repository – also allows me to update the code if there is a need and it should still work as an example for you. I think I have commented the code well but if something is unclear you can ask in the comments or in GitHub repo issues and I’ll try to answer.
- Links to the solution:
The implementation can be split to two parts: configuration and event handling. First the code configures that we use cookie based authentication (used after OIDC authentication) and we use sliding expiration so that framework can renew the authentication cookie automatically (see code comments).
Next the OIDC middleware is configured using UseOpenIdConnectAuthentication method. Here we set the for example the client ID and secret and in ResponseType we define will be using hybrid flow (code id_token). Last step is to handle the OIDC authentication notifications. The main notifications we are interested are the ‘RedirectToIdentityProvider‘ and ‘AuthorizationCodeReceived‘ (and then naturally there is the ‘AuthenticationFailed‘).
RedirectToIdentityProvider (IdP) happens when user is not authenticated and tries to access a protected resource or the user is authenticated and is logging out. The notification contains the ProtocolMessage.RequestType which will be used to decide are we logging out of the application or trying to access a resource that requires authentication. The Episerver sample contains a check for is the user already authenticated but doesn’t have access to the requested resource and does a 403 (Forbidden) response to avoid redirect loop to IdP so this is also included in my code.
I’ve also added code that handles AJAX calls, the sample contains a simple check for XMLHttpRequest header and if the header is present then it’s an AJAX call. This is used in the authentication handling to keep returning 401 for AJAX calls as otherwise if for example you authentication cookie has expired (you were on a lunch) but you still have Episerver edit mode open in your browser. If the code returns HTTP status 403 in this case for DOJO it doesn’t allow user to login but if we return 401 HTTP status it will redirect user to authentication (which I think we want in this case).
AuthorizationCodeReceived is the place where the successful authentication is handled (in our case as we get the authorization code). In this stage OWIN middleware has for example validated the received JWT token (including signature validation). Next in the code we will exchange the authorization code to access token and then validate that the authorization code token and access token have the same Issuer and Subject values (as the specifications say in hybrid flow).
The middleware has created a ClaimsIdentity (notification.AuthenticationTicket.Identity) but we will not use that but create our own ClaimsIdentity. We could have modified the created ClaimsIdentity but I think the code is cleaner and we know for sure what is added to the claims when we construct our own ClaimsIdentity. Note! you want to keep the claims in minimum as these are stored to the cookie stored to users browser so you want to keep that small.
After creating the new ClaimsIdentity and creating a new AuthenticationTicket using that the last part is to make Episerver aware of the user and “roles” the user has. The code gets an instance of ‘ISynchronizingUserService‘ and calls its method ‘SynchronizeAsync‘ passing the ClaimsIdentity to it.
A few words about the ISynchronizingUserService and ClaimsIdentity
I couldn’t find much documentation about this so I had a peek to the default implementation and what it does.
When we create the new ClaimsIdentity the constructor takes nameType and roleType parameters. These “claim names” define what claim type will be used as the name and role claims. In my sample I set the nameType to “epiusername” type, this is my custom named claim type but this could be anything you like I just used that name here to indicate that this claim will be used as the username (NOTE! this really really should be unique) and the displayname in Episerver edit mode. The default Episerver implementation checks what claim type is to be used as the name claim and uses that for username (so in this sample it will use the value of “episerverusername” claim). Same goes for the role(s) claim type, what ever name is set as the roleType Episerver will use those claims as roles when synching.
While peeking the Episerver implementation I noticed that it will also look for the following claims (Microsoft claims under namespace System.Security.Claims) in the ClaimsIdentity:
- ClaimTypes.Email
- ClaimTypes.GivenName
- ClaimTypes.Surname
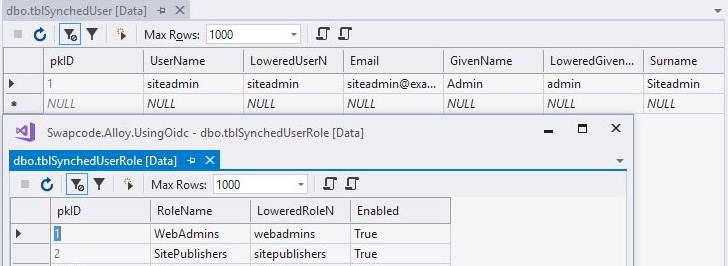
So if you add those claims with a value you will get those synched to Episerver database too and the tables those are stored to are: tblSynchedUser and tblSynchedUserRole.
Setting up Alloy access rights
After you run the application and can login to Episerver using OIDC you will not have any editing rights but you have access to admin views. Next we will setup simple editing rights for all ‘SitePublishers’ role/group members.
- go to admin view ⇒ Set access rights
- select ‘Root’ node and click ‘Add Users/Groups’
- select ‘Groups’ in the ‘Type’ dropdown and click ‘Search’
- double click the ‘SitePublishers’ and click ‘OK’
- select all checkboxes for ‘SitePublishers’ group row
- select the ‘Apply settings for all subitems’ and click ‘Save’
- click ‘OK’ to the confirmation dialog
Now you can edit content with users that belong/have the ‘SitePublishers’ claim.
Setup issues
I started preparing this blog posting over four months ago and a lot has happened during that time (in private life) and now this is the third time (third time’s a charm ;-P) I write this posting. So back to the issues you might face. I can think of only one if you are using Episerver Find but you cannot update to the 13.0.3 version or higher. The used IdentityModel package latest version requires Newtonsoft.Json 11+ and you cannot use that Find if using version prior to 13.0.3. The highest version of IdentityModel you can install is then package version 3.2.0 which will add a bunch of not needed NuGet packages to your project:
- System.IO
- System.Runtime
- System.Security.Cryptography.Encoding
- System.Security.Cryptography.Primitives
- System.Security.Cryptography.Algorithms
- System.Security.Cryptography.X509Certificates
- System.Net.Http
- (Thank you .NET standard)
The effect depends on your Visual Studio 2017 version, before VS version 15.8.0 those packages “only” show as missing references when looking at project references. After 15.8.0 version (with default VS settings) VS adds binding redirects to web config for ‘System.Net.Http‘ and ‘System.Runtime‘. Now if you try to run the web app it fails to start with Exception. Solution is to remove those binding redirects BUT if you update or add new NuGet packages those are nicely added back so you need to remember to remove those again.
Real world issue
Well this is a real life issue we had in one project. Everything was working in our development and test environments but when it was time to use customers environment the signature validation failed for the returned authorization code. Erm, we are using a standard and everything should just work. Even my very good friend Google didn’t at first offer me a solution until finally I happened to stumble upon a case where an OpenId Connect implementation JWK endpoint returned modulus contained 0 as first byte. Well it was the same with our case so we had to implement a custom SignatureValidator and pass that to TokenValidationParameters.SignatureValidator.
This implementation used the JwtSecurityTokenHandler to ReadJwtToken from the token it is passed. Then it used the DiscoveryClient to get the public keys and use the parsed token header Kid (key identifier) value to find the correct key from discovery response. Then the key was transformed to byte array and checked if the first byte is 0 and if it was the case then remove the first byte and do the signature validation with correct modulus. Have a look at this post on Stack Overflow about signature validation.
Other sources about Episerver and OIDC
Some previous blog postings about using OIDC with Episerver, not in any particular order and sorry if I missed your blog post. Ping me and I will include it to the list.
- Svein Aandahl, How to setup OAuth2.0 integration between IdentityServer3 and Episerver
- Johan Boström, EPiServer authentication done with OpenID Connect and IdentityServer
- Johan Kronberg, Add an Epi site to the IdentityServer4 combined quickstart using OIDC
- Eric Herlitz,
- Episerver, Integrate Azure AD using OpenID Connect
- IdentityServer,
- Microsoft Press Store, The OWIN OpenID Connect Middleware
- Usefull online tool: JSON Web Tokens

Thank you so much for writing this up and providing a very detailed GitHub example project for getting Epi and Open ID Connect to work. This saved me a TON of time and is (hands down) one of the best write ups I have seen in a while especially in the Epi IaaS space. Keep up the good work and I owe you a drink!